
The project is to make microservices in place of a monolithic nodejs application stack. Apache Web Server, php-fpm, nodejs application server with mongodb, mysql backend.
This got divided into 2 seperate projects, of LAMP and MEAN stack. It can be tweaked to have the php-fpm LAMP read/Write from the MongoDB Database and to have the NodeJS / Express talk to the MySql DB.
- I put the NodeJS code into AWS Lambda,
- made both Mongodb and MYsql replicated
- put Apache, phpfm which use the replicated Mysql into separate containers connected via docker-compose.
- This docker-compose containers runs on boot from an AMI image
- The image is automatically launched and monitored by Launch Groups behind an Elastic Load Balancer.
- Internal IPs are mostly used for speed and security
- Route 53 DNS is employed for both internal and public IP addresses.
In All this environment starts with 7 EC2 servers and a Lambda Function. The amount of EC2 servers can grow as each one passes 60% CPU usage threshold.

Step one – for High Availability setup MongoDB replica set on EC2 servers.
- Setup 3 Mongo servers for replica set
- on one server change network settings in mongod.conf to 0.0.0.0 . Be careful as this is a yaml file
- Make AMI image of the first server then launch the other 2.
- having the AMI preconfigured makes replacing a server quicker
the servers should only need internal IP. - For this demo I used an external IP address for the primary server since the Lambda was in a different account, if it’s in the same account it can use the VPC.
- In the event that the database goes down, The replica can replace it in minutes via manual intervention.
- Cloudwatch messages should be implemented that monitor each microservice and database.
- The MongoDB replica can be setup without External internet Ip address thus being open only to it’s VPC, which Lambda can do when it is in the same AWS account.
To set up the MongoDB replica set Follow the directions at https://docs.mongodb.com/manual/tutorial/deploy-replica-set/
edit mongod files to add replication and IP of the primary.
The main part of the directions are included here.
in /etc/mongod.conf you need to allow network communication. I set the network settings to be open to the internet because the NodeJS was in a different AWS account. BE VERY CAREFUL The file is yaml, so spacing counts. the best idea is to just remove the comment from in front of the BindIP and change 127.0.0.0 to whatever you need. I made it open to the internet with 0.0.0.0 since Lambda isn’t a single IP address.
Then add the following, be sure to use the same spacing as the rest of the file or it won’t work. DON’T use tabs.
replication:
   replSetName: "octopus"
I gave DNS to the internal IPs, all are in the VPC and same AZ.
Run on the primary server.
log into mongo Db by entering
Mongo
then paste in the following , after you change the domains and _id to your own. BTW: ALL 3 of these domain names are only internal on the VPC (mongo1.int.geo.charm.i.ng)
rs.initiate( {
_id : “octopus”,
members: [
{ _id: 0, host: “mongo1.int.geo.charm.i.ng:27017” },
{ _id: 1, host: “mongo2.int.geo.charm.i.ng:27017” },
{ _id: 2, host: “mongo3.int.geo.charm.i.ng:27017” }
]
})
More information on second up MongoDB replica set as primary server can be found at :
https://docs.mongodb.com/manual/tutorial/force-member-to-be-primary/
Step Two – move NodeJS to Lambda
The process to move the NodeJS to Lambda was actually straightforward.
Whatever references you have to speak with MongoDB need to be changed. The connection from localhost:20017 needs to refer to a DNS entry of your Mongodb.
After this follow Claudia.js instructions.
I really followed only the directions from: https://medium.freecodecamp.org/express-js-and-aws-lambda-a-serverless-love-story-7c77ba0eaa35
I had the old MEAN stack on an EC2, Windows Server 2016. I didn’t bother with AWS IAM keys. Instead I assigned an Administrator role to the instance. But directions on how to use the key are at that link.
I ran:
claudia generate-serverless-express-proxy --express-module app
This step generated a file named lambda.js
That’s it! Now you only need to deploy your Express app (with lambda.js file) to AWS Lambda and API Gateway using the claudia create command. I needed to add –timeout 20 since it takes more than 3 seconds to run. See: https://claudiajs.com/documentation.html
claudia create --handler lambda.handler --deploy-proxy-api --region eu-central-1 --timeout 20
The output gives you a link from AWS API that will magically run your NodeJS app. Something like this:
{
  "lambda": {
    "role": "awesome-serverless-expressjs-app-executor",
    "name": "awesome-serverless-expressjs-app",
    "region": "eu-central-1"
  },
  "api": {
    "id": "iltfb5bke3",
    "url": "https://iltfb5bke3.execute-api.eu-central-1.amazonaws.com/latest"
  }
}
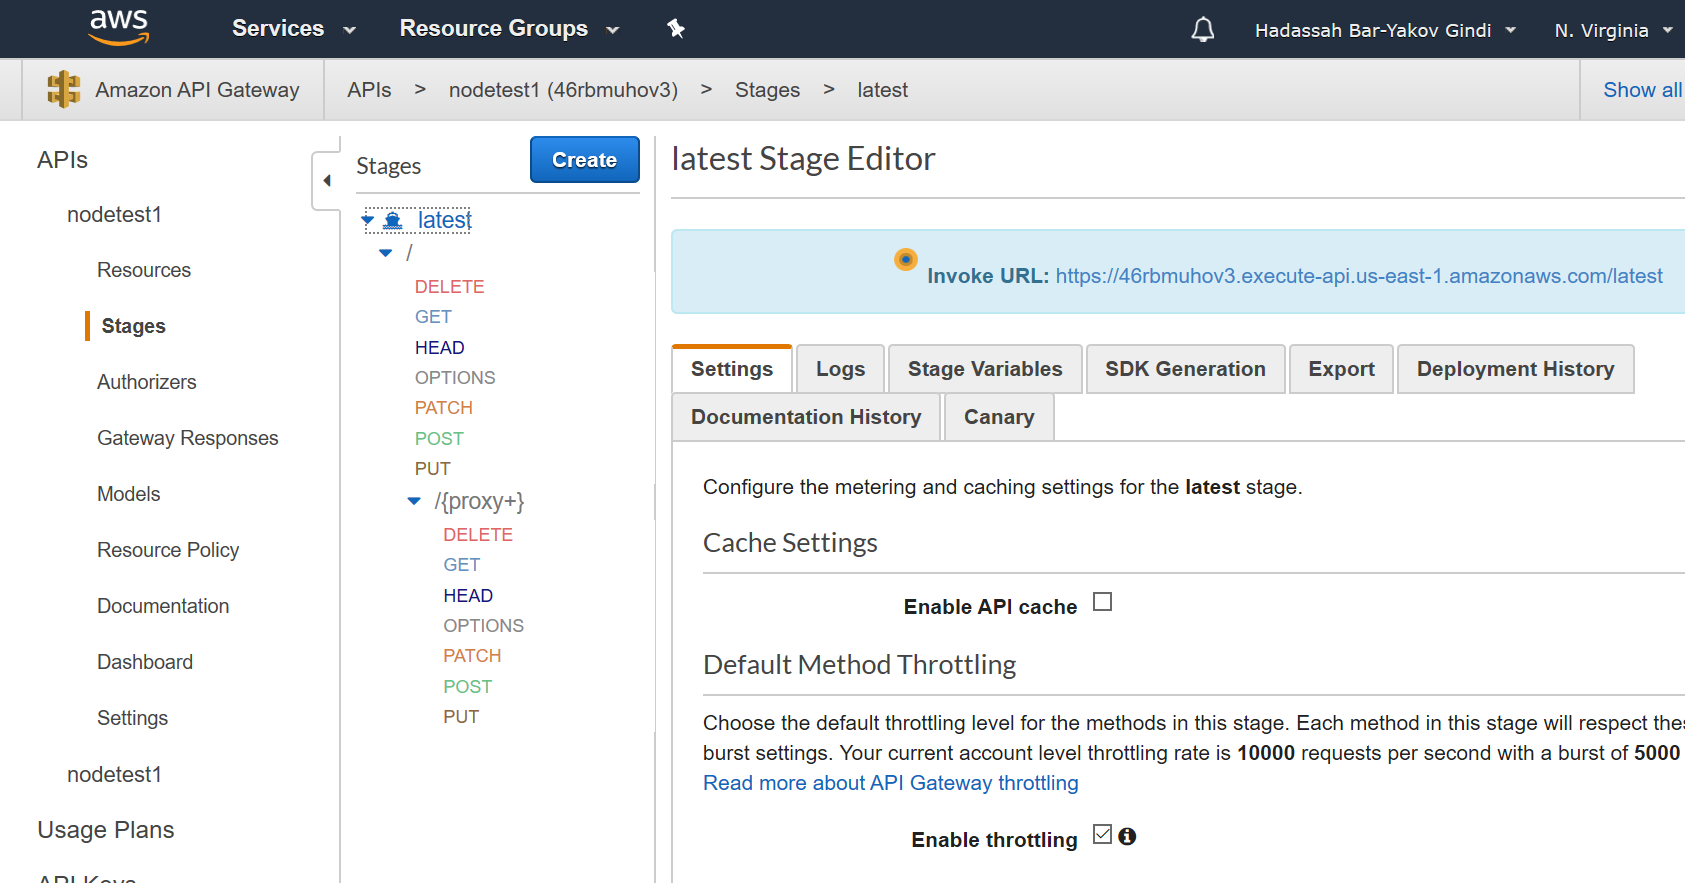
If you lose this output with the address , you can get the address from the API Gateway under stages and latest.
Also See: https://claudiajs.com/tutorials/serverless-express.html
We have completed separating 2 parts of our Monolithic app. We put the MongoDb on it’s own server, made this replicated for High Availability. We put our code on Lambda, which can run hundreds and hundreds of your script instances all at the same time.
Now Lets Setup the LAMP stack with php-fpm.
I first setup 2 MySql servers to act as Master/Slave replication.
php-fpm is widely used, but seems to have been abandoned as an apache project in 2011.
Since I am using Docker Compose leaving the server settings as “localhost” is OK. the Links command in the Docker-Compose.yml file makes the containers connect like a single server. The Php Code, itself, need to call the Database by servername, which is likely part of your code too.
See the GitHub repository for a discussion about how this docker-compose works.
https://github.com/CharmingSteve/php-fpm-apache-docker-compose
Step three – Setup the MySQL Master / Slave
To setup MySql replication I used the following 3 links.
https://dev.mysql.com/doc/refman/5.5/en/replication-howto-existingdata.html
http://dbadiaries.com/how-to-set-up-mysql-replication/
I had one glitch I had placed new config data under mysqld_safe, which is wrong. I am making a Master Slave.
[mysqld]
datadir=/var/lib/mysql
socket=/var/lib/mysql/mysql.sock
# Disabling symbolic-links is recommended to prevent assorted security risks
symbolic-links=0
# These are the lines that I added for replication.
server-id = 1
binlog-do-db=testDB
relay-log = /var/lib/mysql/mysql-relay-bin
relay-log-index = /var/lib/mysql/mysql-relay-bin.index
log-error = /var/lib/mysql/mysql.err
master-info-file = /var/lib/mysql/mysql-master.info
relay-log-info-file = /var/lib/mysql/mysql-relay-log.info
log-bin = /var/lib/mysql/mysql-bin

# Settings user and group are ignored when systemd is used.
# If you need to run mysqld under a different user or group,
# customize your systemd unit file for mysqld according to the
# instructions in http://fedoraproject.org/wiki/Systemd

[mysqld_safe]
log-error=/var/log/mysqld.log
pid-file=/var/run/mysqld/mysqld.pid
Once that’s is correct on both servers, following the directions at the links.
The following directions are pasted straight from: http://www.geekpills.com/operating-system/linux/mysql-howto-set-master-slave-replication
Configure Master Server
For configure Master MySQL Server, we need to edit my.cnf file, this is configuration file of MySQL. Open /etc/my.cnf file in your editor.
bind-address=0.0.0.0
server-id=1
log_bin=/var/lib/mysql/mysql-bin.log
binlog_do_db=zabbix
In above Derivatives, we tried to implement required parameters for Master MySQL Server. Let’s discuss it.
"bind-address --  0.0.0.0" we bind MySQL process to all Internet protocol address assigned on machine.

"Server-id  --  1" denote that this machine will act as Master Server in replication.

"Log_bin  --  /var/log/mysql/mysql-bin.log" mentioned path and prefix for bin log files. These binary log contains all sql query which change database.

"binlog_do_db  --  zabbix" contain database name that should cover for bin log.
Now we need to restart MySQL Server on Master MySQL machine. You would see log-bin files in mentioned location after this.
[root@srv7-master mysql]# pwd
/var/lib/mysql
[root@srv7-master mysql]# ls -lh mysql-bin.*
-rw-r----- 1 mysql mysql 808K Aug 18 12:57 mysql-bin.000001
-rw-r----- 1 mysql mysql   32 Aug 18 12:22 mysql-bin.index
Now we need to create MySQL user for Salve machine that would send data towards Slave MySQL machine to replicate data on that database.
[root@srv7-master mysql]# mysql
Welcome to the MySQL monitor.  Commands end with ; or \g.
Your MySQL connection id is 617
Server version: 5.7.19-log MySQL Community Server (GPL)

Copyright (c) 2000, 2017, Oracle and/or its affiliates. All rights reserved.

Oracle is a registered trademark of Oracle Corporation and/or its
affiliates. Other names may be trademarks of their respective
owners.

Type 'help;' or '\h' for help. Type '\c' to clear the current input statement.

mysql> GRANT REPLICATION SLAVE ON *.* TO 'replicator'@'192.168.122.121' IDENTIFIED BY 'Passw0rd';
Query OK, 0 rows affected, 1 warning (0.02 sec)

mysql> FLUSH PRIVILEGES;
Query OK, 0 rows affected (0.02 sec)

mysql> FLUSH TABLES WITH READ LOCK;
Query OK, 0 rows affected (0.01 sec)

mysql> show master status;
+------------------+----------+--------------+------------------+-------------------+
| File             | Position | Binlog_Do_DB | Binlog_Ignore_DB | Executed_Gtid_Set |
+------------------+----------+--------------+------------------+-------------------+
| mysql-bin.000005 |   389203 | zabbix       |                  |                   |
+------------------+----------+--------------+------------------+-------------------+
1 row in set (0.00 sec)
Don’t exit above MySQL console, Exit it once MySQL Slave configuration is complete .
Now take backup of database from another console of Master Server, so we could restore it in Slave MySQL Machine. Online MySQL replication work only to execute change in table of respective database. It Will not create any database and tables created before or while replication, we have to create same replica of database and tables.
[root@srv7-master ~]# mysqldump -u root -p zabbix > zabbix.sql
Enter password:
[root@srv7-master ~]# ls -lh zabbix.sql
-rw-r--r-- 1 root root 12M Aug 18 17:46 zabbix.sql
Configure Slave Server
As of now we have configured Master MySQL Server, Now we need to configure Slave Server for replication. First of all we need to create database on Slave MySQL machine so that we could save changes that replicate from Master Server.
mysql> create database zabbix;
Now we need to edit Slave my.cnf file in such way that we did in Master MySQL server.
server-id=2
relay-log=/var/lib/mysql/mysql-relay-bin.log
log_bin=/var/lib/mysql/mysql-bin.log
binlog_do_db=zabbix
Restore database backup which we had taken above.
[root@srv7-sec ~]#mysql -u root zabbix -p < zabbix.sql
Enter password:
Now restart MySQL process in MySQL Slave server.
[root@srv7-sec ~]# systemctl restart mysql
Now we have to provide user information of replication user that we have created on Master MySQL Server.
Login on Slave mySQL Server
mysql >CHANGE MASTER TO MASTER_HOST='192.168.122.109',MASTER_USER='replicator', MASTER_PASSWORD='Passw0rd', MASTER_LOG_FILE='mysql-bin.000005', MASTER_LOG_POS=389203;
Now start Slave process
mysql> start slave
Now exit from Master Server MySQL console where we out read lock and check Master status, it should increase position as usual.
Now we should also check Slave MySQL status as well like below
root@srv7-sec ~]# watch -n 0.1 'mysql -e "SHOW SLAVE STATUS\G"'
Below values woudl continually change
        Master_Log_File: mysql-bin.000005
          Read_Master_Log_Pos: 3578115
               Relay_Log_File: mysql-relay-bin.000003
                Relay_Log_Pos: 653020
        Relay_Master_Log_File: mysql-bin.000005
             Slave_IO_Running: Yes
            Slave_SQL_Running: Yes
              Replicate_Do_DB:
          Replicate_Ignore_DB:
           Replicate_Do_Table:
       Replicate_Ignore_Table:
      Replicate_Wild_Do_Table:
  Replicate_Wild_Ignore_Table:
                   Last_Errno: 0
                   Last_Error:
                 Skip_Counter: 0
          Exec_Master_Log_Pos: 3578115
              Relay_Log_Space: 3189605
MySQL replication has lot more option, this is just brief overview on same.we will going to post some other post on same covering other options with details for MySQL replication.
Step Four – Configure php-fpm / LAMP on High Availability Load Balanced – Auto Scaling group.
I installed this in containers using Docker-Compose. The HTML and PHP code are on a Volume on the host /var/www , however , depending on the situation it might be wiser to keep /var/www in the container.
The following instructions are from: https://docs.aws.amazon.com/autoscaling/ec2/userguide/as-register-lbs-with-asg.html
You can see the docker-compose file on my Github.
https://github.com/CharmingSteve/php-fpm-apache-docker-compose
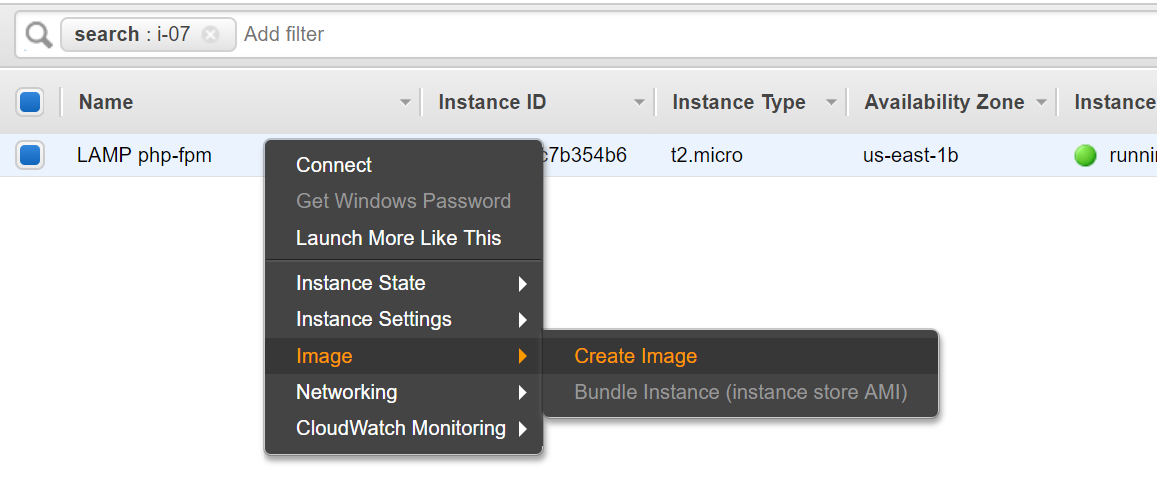
Now you need to save your working Instance into an Image. In the EC2 panel right click the instance and select create image. Assign it a name and create the image, it takes a few minutes.
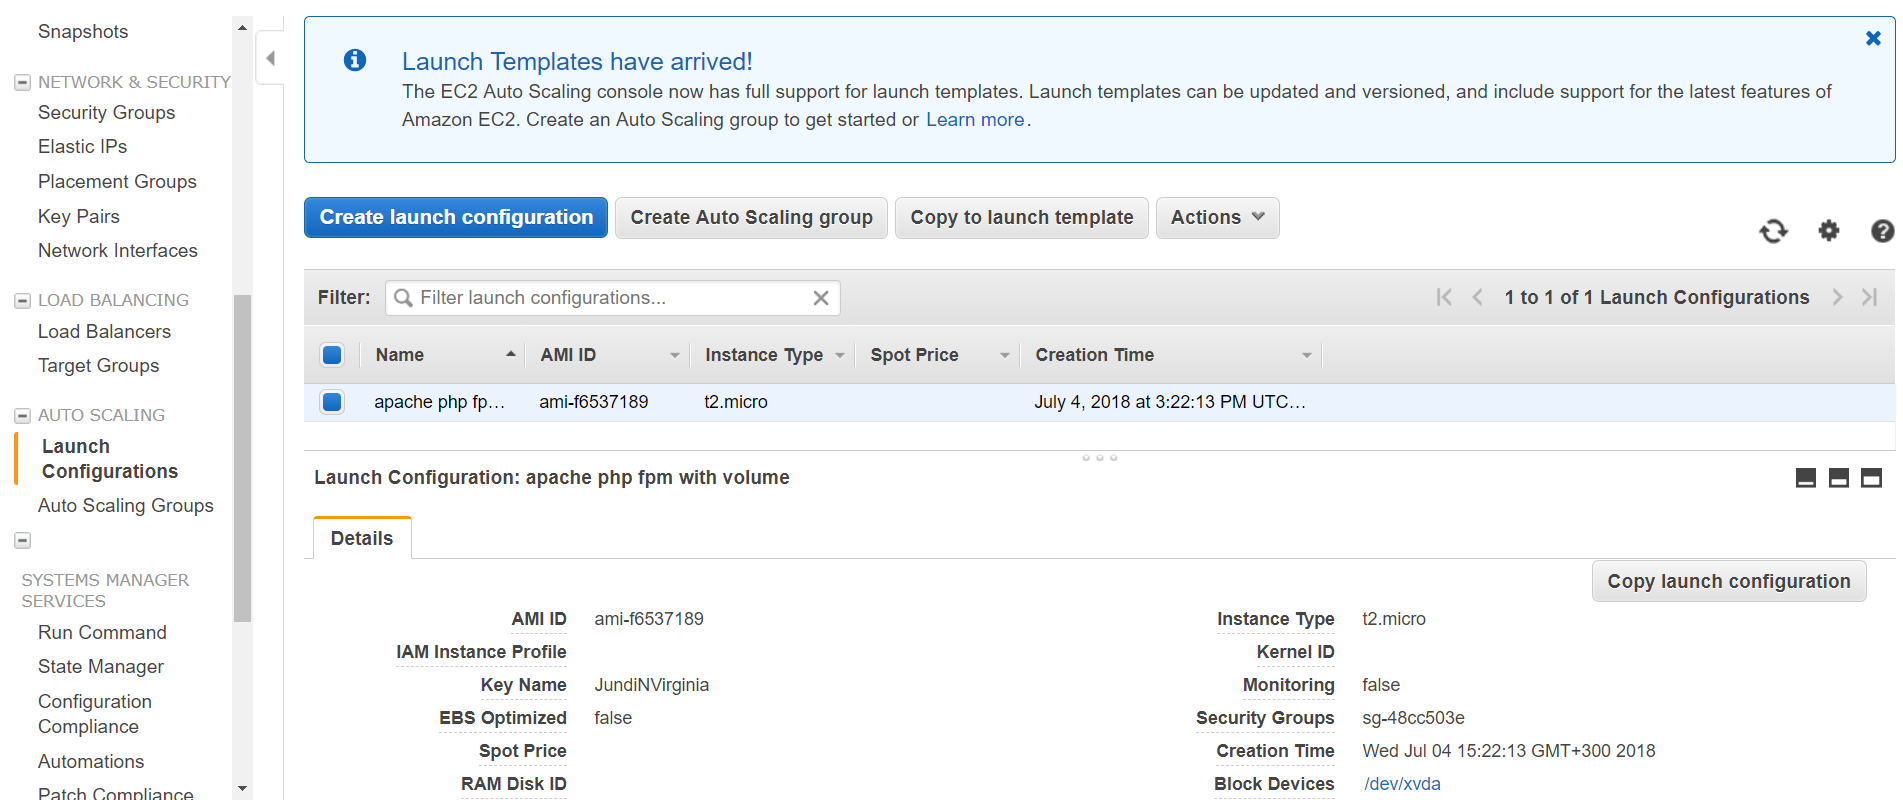
Create or Select a Launch Configuration
A launch configuration specifies the type of EC2 instance that Amazon EC2 Auto Scaling creates for you. When you create a launch configuration, you include information such as the ID of the Amazon Machine Image (AMI) which you created above in order to use, the instance type, key pair, and block device mapping. If you created a launch template, you can use your launch template to create an Auto Scaling group instead of using a launch configuration. For more information, see Creating an Auto Scaling Group Using a Launch Template. The following is copied from the link:
https://docs.aws.amazon.com/autoscaling/ec2/userguide/GettingStartedTutorial.html
If you already have a launch configuration that you’d like to use, select it using the following procedure.
To select an existing launch configuration
- Open the Amazon EC2 console at https://console.aws.amazon.com/ec2/.
- On the navigation bar at the top of the screen, select the region that you used when creating your load balancer.
- On the navigation pane, under Auto Scaling, choose Auto Scaling Groups.
- On the next page, choose Create Auto Scaling group.
- On the Create Auto Scaling Group page, choose Launch Configuration, select an existing launch configuration, and then choose Next Step.
To create a new launch configuration, use the following procedure:
To create a launch configuration
- Open the Amazon EC2 console at https://console.aws.amazon.com/ec2/.
- On the navigation bar at the top of the screen, select the region that you used when creating your load balancer.
- On the navigation pane, under Auto Scaling, choose Auto Scaling Groups.
- On the next page, choose Create Auto Scaling group.
- On the Create Auto Scaling Group page, choose Launch Configuration, Create a new launch configuration, and then choose Next Step.
- On the Choose AMI page, select your custom AMI.
- On the Choose Instance Type page, select a hardware configuration for your instance, and then choose Next: Configure details.
- On the Configure Details page, do the following:
- For Name, type a name for your launch configuration.
- (Optional) To securely distribute credentials to your EC2 instance, select your IAM role.
- (Optional) If you need to connect to an instance in a nondefault VPC, for Advanced Details, IP Address Type, choose Assign a public IP address to every instance.
- (Optional) To specify user data or a configuration script for your instance, for Advanced Details, User data, paste your configuration script.
- Choose Skip to review.
- On the Review page, choose Edit security groups. Follow the instructions to choose an existing security group, and then choose Review.
- On the Review page, choose Create launch configuration.
- On the Select an existing key pair or create a new key pair page, select one of the listed options. Select the acknowledgment check box, and then choose Create launch configuration.
Warning
Do not choose Proceed without a key pair if you need to connect to your instance.
After completing the instructions above, you’re ready to proceed with the wizard to create an Auto Scaling group.
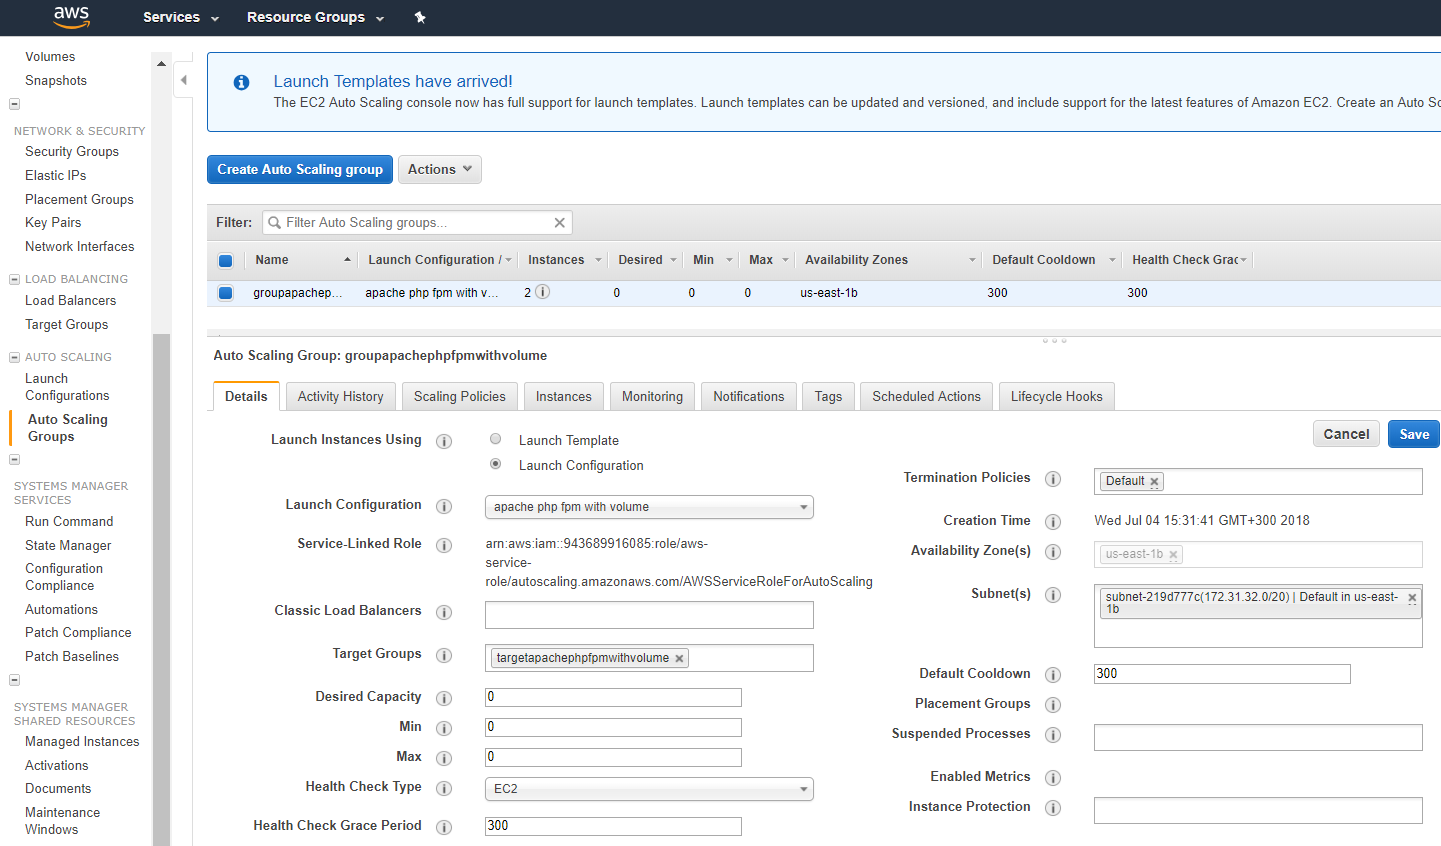
Create an Auto Scaling Group
Use the following procedure to continue where you left off after selecting or creating your launch configuration.
To create an Auto Scaling group
- On the Configure Auto Scaling group details page, do the following:
- For Group name, type a name for your Auto Scaling group.
- For Group size, type the initial number of instances for your Auto Scaling group.
- If you selected an instance type for your launch configuration that requires a VPC, such as a T2 instance, you must select a VPC for Network. Otherwise, if your account supports EC2-Classic and you selected an instance type that doesn’t require a VPC, you can select either
Launch into EC2-Classicor a VPC. - If you selected a VPC in the previous step, select one or more subnets from Subnet. If you selected EC2-Classic instead, select one or more Availability Zones from Availability Zone(s).
- For Advanced Details, select
Receive traffic from Elastic Load Balancer(s)and then do one of the following:- [Classic Load Balancers] Select your load balancer from Load Balancers.
- [Target groups] Select your target group from Target Groups.
- (Optional) To use Elastic Load Balancing health checks, choose ELB for Advanced Details, Health Check Type.
- Choose Next: Configure scaling policies.
- On the Configure scaling policies page, select Keep this group at its initial size, and then chooseReview.If you want to configure scaling policies for your Auto Scaling group, see Create an Auto Scaling Group with Target Tracking Scaling Policies.
- Review the details of your Auto Scaling group. You can choose Edit to make changes. When you are finished, choose Create Auto Scaling group.
For Continuous Delivery CD
Continuous Delivery is easy.
- when you update your code / the AMI image, etc create a new Autoscaling Launch Configuration with the new AMI, etc. You can chose to have some of them as spot instances to save money.
- Then edit the Autoscaling group, select the new Launch configuration.
- Double your minimum capacity in the Launch Configuration
- Wait for everything to settle
- Reduce back to your original Capacity. The oldest instances will be retired.
Open Stack
This configuration can be installed open stack, The Lambda Function NodeJS would go into a container instead of on Lambda. If one uses Azure Functions, you could out the Php as well as the NODE Js there.